
Photo Flexagons
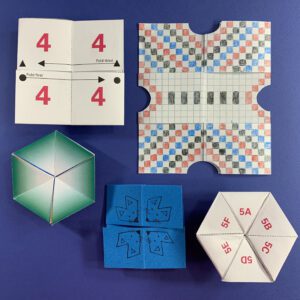
Photo Flexagons!
I am working on the video on how to add a Photo to this in Photoshop…that is the goal.
To begin, practice by making these flexagons to determine what photos you want to feature.
Here are the templates to print: (I have some printed in the classroom already.)
THESE ARE JUST TO PRACTICE FOLDING!
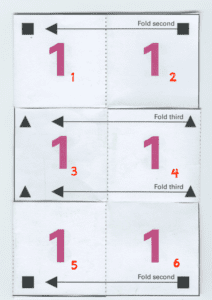
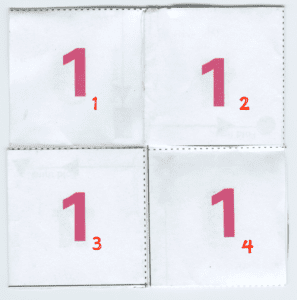
flexagon_hexaTetra_Instructions_handout
Flexagons – Additional Resources.docx
TIPS:
Fold on the lines carefully. Once you fold it one way (mountain fold) fold it the opposite way (valley fold) in order to flex the paper into moving both ways.
Here is a link to a video that explains a bit more about Flexagons and how to put them together.
https://drive.google.com/file/d/1p_sopGjEVSi-Do_968QD3jIwOVxOokdS/view
NOW, TO MAKE with our OWN PHOTOS!
When you are ready to create with Photoshop and photos you took.
Here are the templates that will help you take one photo and select the correct parts of the photo to copy and paste into the template attached above. We will then print them double sided to create our photo flexagons.
flexagon_hexaTetra- front and back
Download Both .PSD.
AND Download the TEMPLATE of the FINISHED one to copy off of.
flexagon_tetraTetra- front and back
Download both .PSD
AND Download the TEMPLATE of the FINISHED one to copy off of.
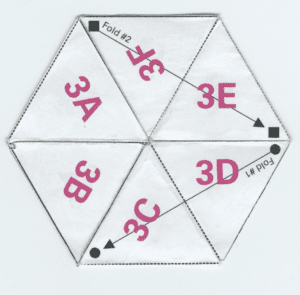 flexagon_trihexa- front and back
Download both .PSD
AND Download the TEMPLATE of the FINISHED one to copy off of.
Open the template for the Flexagon you are making.
Here I am making the 4 face easy one.
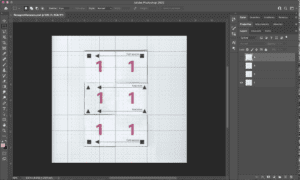
- Open and Copy and Paste your photo image into this file.
- Free Transform to get it to fit the size.
- Use the opacity slider on the layers Panel to pull down the opacity (make it transparent) so you can see where the template is.
- Do not worry if the image goes off the edges of the template, we are going to be copying square pieces off of this file and pasting them onto the other Handout in just a minute.
- Repeat with the other photos needed. One photo per layer in the template.
- Save As .PSD for safe keeping.
Open the Handout linked at the top of these instructions.
- download file, both the FRONT and the BACK.
- In Photoshop, go to File> Open.
- You should have opened 2 Tabs with the handout document so that we can build the flexagon on both of them (one is the front and one is the back.)
- You will be moving in between these 3 tabs to create the flexagon on the 2 pages we just opened.
- Start with photo 1.
- Go to the Photo we have in the first file.
- Find the 1A box.
- Use the rectangle marguee tool to SELECT that section of the photo.
- (If you are using the triangle, you will use the Polygonal Lasso Tool (lives under lasso tool)
- Edit Copy.
- Go to New File we are building on.
- Edit Paste.
- Free transform if is does not fit or you need to rotate it to the correct orientation.
- TIP: HOLD SHIFT down as you rotate and it will rotate at 45 degrees at a time. easy to go 45, then 90, etc.
- Repeat with the rest of the squares (or triangles).
- You may need to pull the opacity slider down and up to see if you have it aligned correctly.
- You may need to do some problem solving with the model you made to figure out which 1 is which. that is the puzzle. Maybe mark your model with symbols and then deconstruct to see which one is which one.
Have fun!
Save As .PSD to the Adobe Cloud and then export as .png.
Upload them to the PADLET and I will print them back to back… I have to create a 2 page .pdf in order to print back to back with it lined up correctly.
Then cut and fold.
Done!